3D
The Perfect Chair Fort
by Naomi Thomson @silverspooncakes · submitted Aug 10, 2011 · 2011 contest
1 / 51
Description
The Making of "The Perfect Chair Fort" Cake!
Alright! This could be long, but here goes nothing!
I have been wanting to enter the Threadcakes contest for a couple of years now, but only this year have I taken the time to actually do it. I think I'd always lost the nerve to do it before because... well... all of the other entries are always so amazing! And knowing my skills are limited with making cakes, I was nervous to even attempt it. But, entering the contest this time around, I thought it would be an experience worth having. And it certainly was that!
Start to finish, this is how this cake came to be...
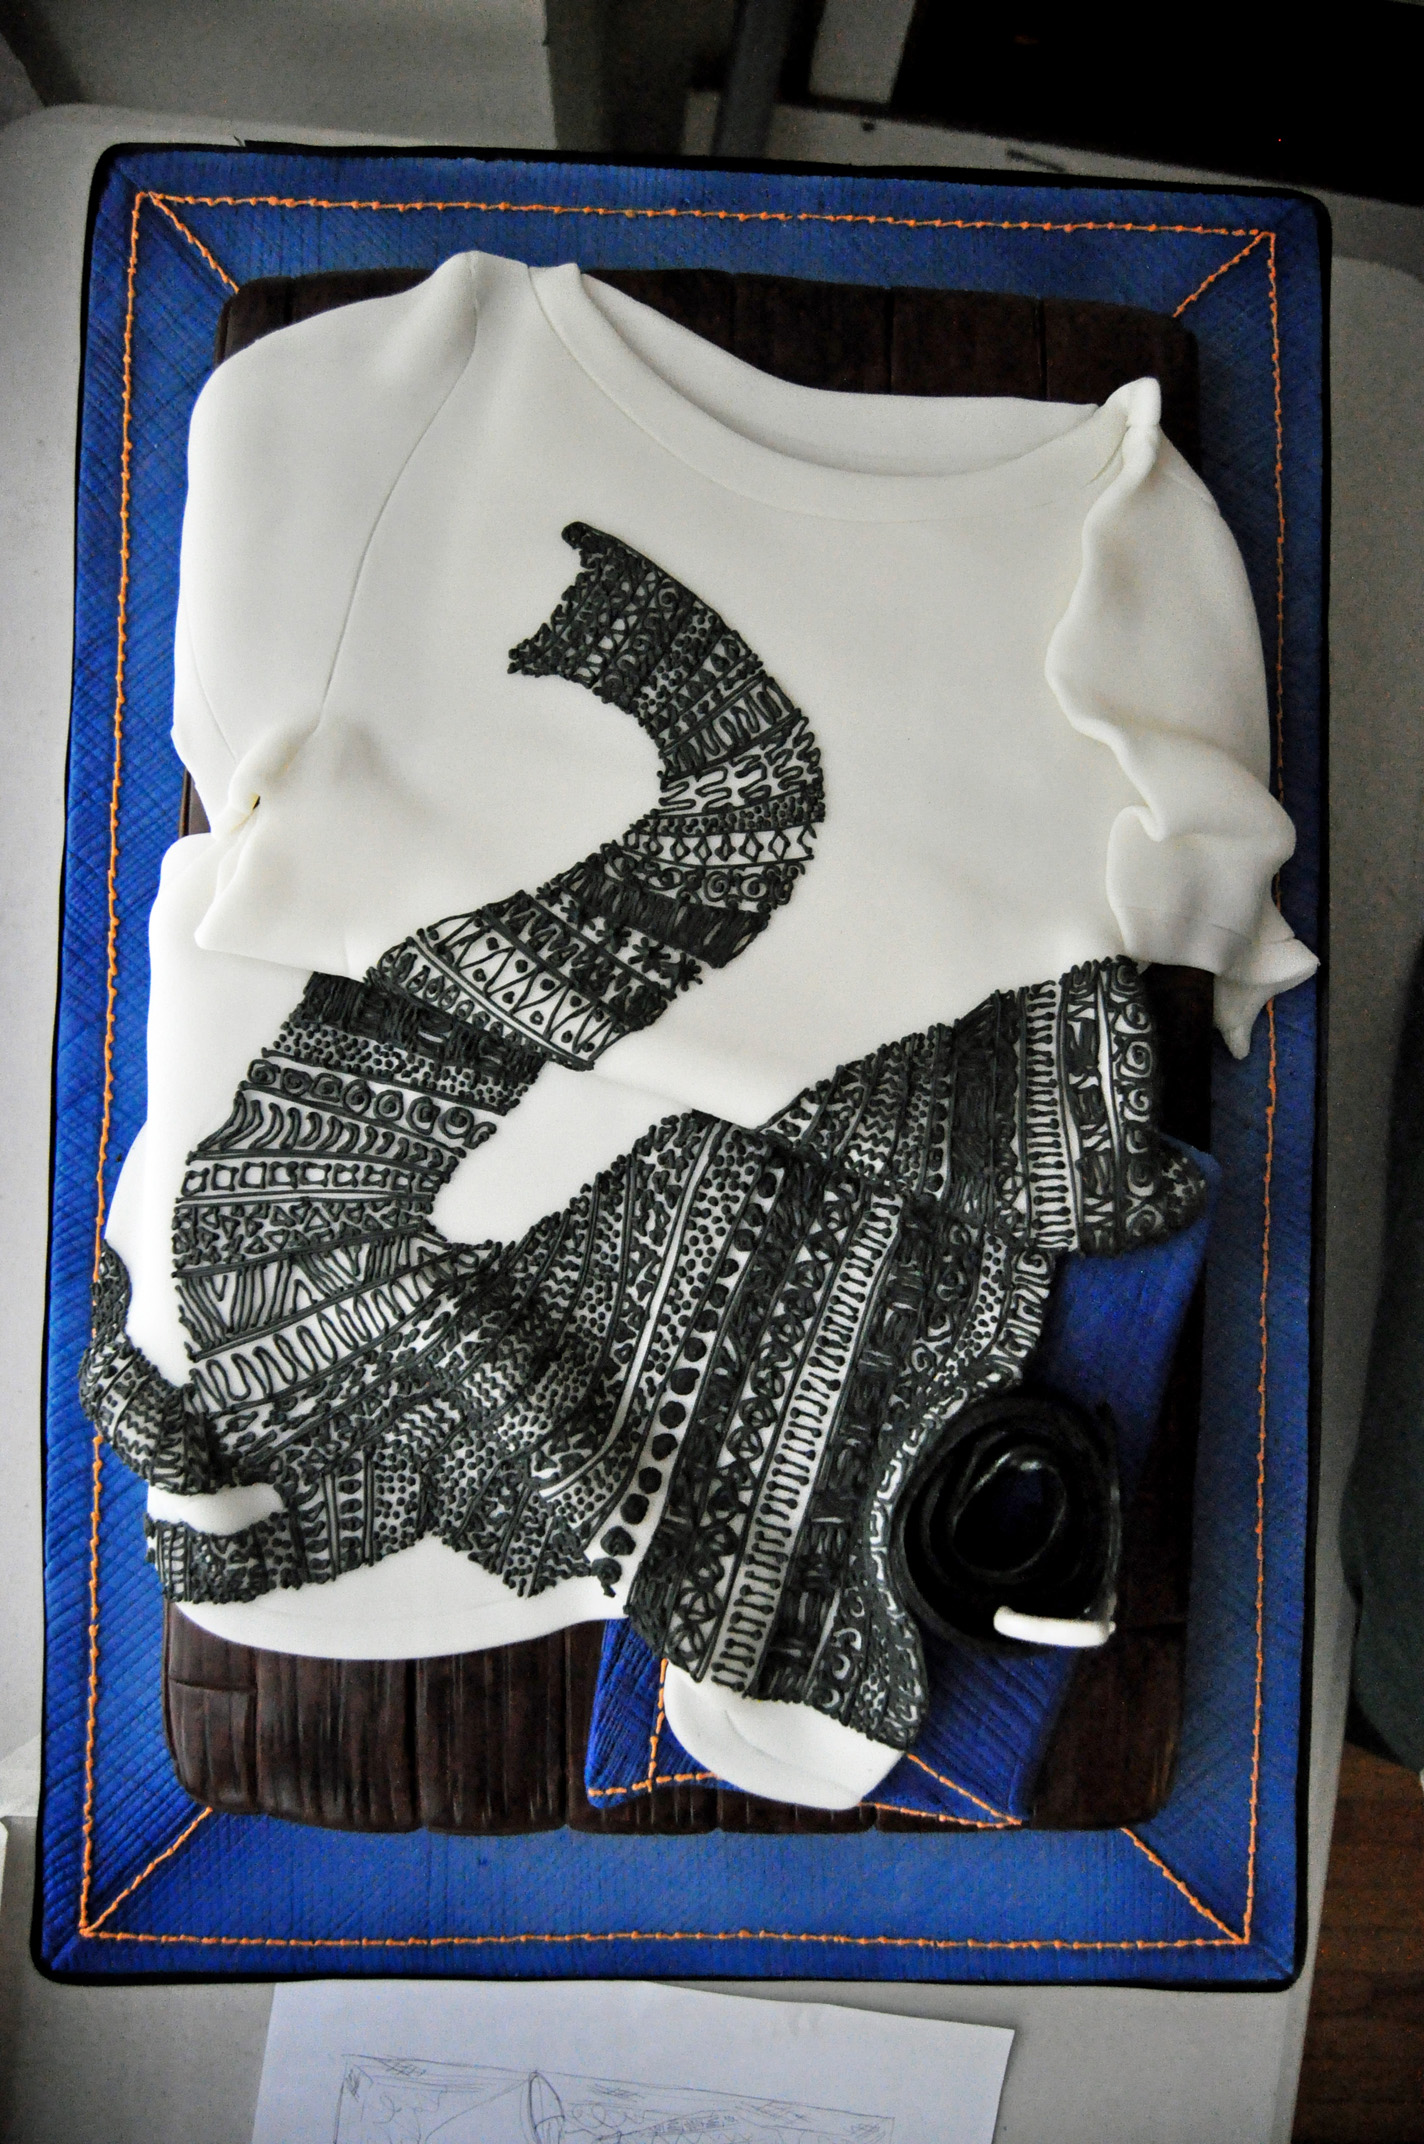
I started by choosing a design. I wanted to choose something that I thought I could make into a cake, but nothing that I felt I couldn't do well. I chose "The Perfect Chair Fort" (one of my favorite Threadless designs) because I felt that it was challenging enough to make me try some new things, but also realistic enough that I felt I could actually have a chance at making it recognizable for what it was supposed to be. :-P So... Then I started sketching out the way it was going to look, just to give myself an actual-size template to go on when I was making everything.
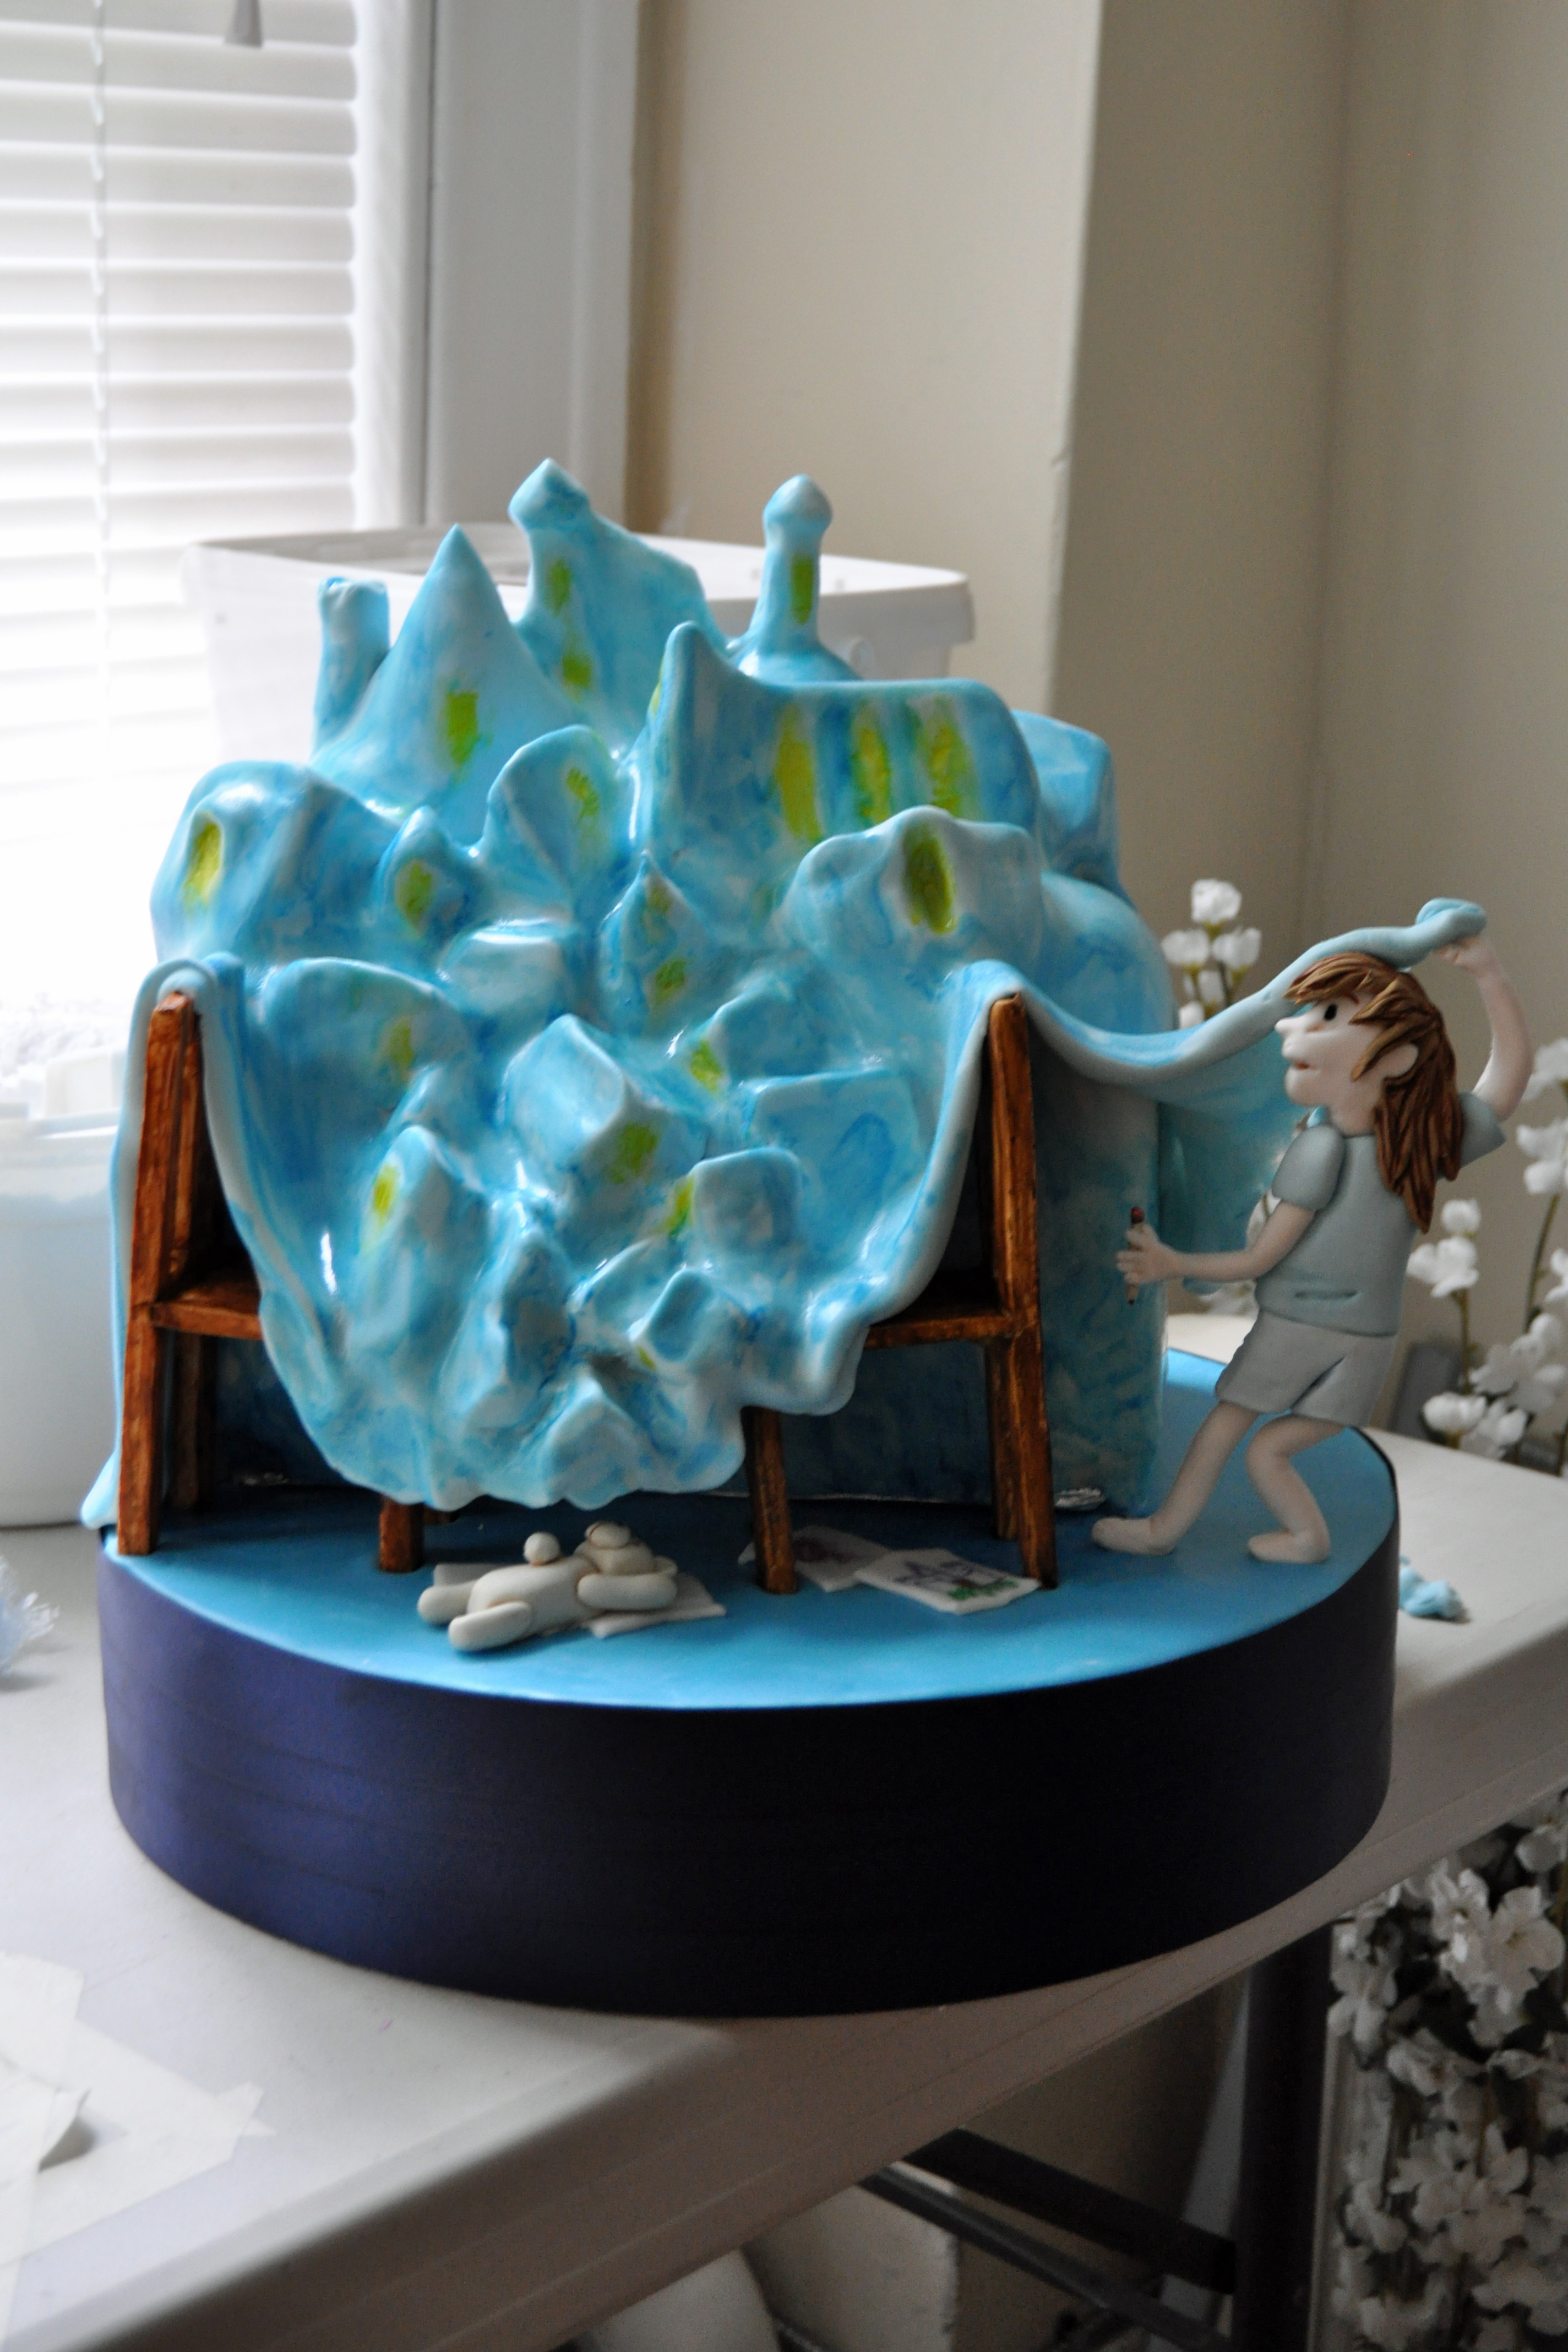
I started by making the girl (I'll call her Lizzy), the teddy bear, and a few little pieces that would sit under the "Blanket" and give the shape of the houses. I worked on all of the buildings over the course of a few days, just because I didn't really have too much time to put into it every day. Making Lizzy was a new experience, since I had never done any modeling before particularly. I also didn't have any modeling paste, and wanting to make her stand up... so, I ended up using gum paste (thinking that it should dry nicely for me). Then I made the chairs. I let these pieces dry for a few days.
Once the chairs were dry, I used diluted brown and copper food colorings to paint the chairs and make them look like wood. Once these were dry (I let them dry overnight, I think), I used royal icing to glue the chair pieces together. I let that dry overnight again, and the following day I painted over the white royal icing with brown to make them look a little neater.
Then I baked the cake; I used a nice yellow cake recipe that I have, and I baked it in a, 11"x15" cake pan. One the cake was cool, I leveled the top and cut it into three pieces (for the three cake layers). I used the cake scraps to make a cake paste mixture of crumbled up cake and buttercream.
I make cakes pretty often, so I had some white chocolate buttercream in my fridge. I used this to fill the layers and make the cake paste. Once that was done, I refrigerated the cake for a bit, then took it out to build up the shape of the top of the cake with the cake paste (I used the picture of the T-shirt design as a template to figure out where to make it taller and where not to-- so that all of my little building shapes would sit at the right heights and in the right places). Then, back into the fridge it went until the cake was nice and cold.
In the meantime (and I know I should have been on this way ahead of time, but alas... I was not), I used a foam cake dummy as the cake board. I used some blue colored fondant to cover it, and then navy blue ribbon to wrap around the sides. Then I set this aside till I was ready to use it.
When the cake was cold enough (so that the cake paste on the top was firm), I crumb-coated the outside and set the cake on a small rectangle board. Then I covered the cake with white fondant, set it onto the cake board in its proper place, and started attaching the buildings with royal icing. I also set up the chairs, and then used a piece of fondant to make a bridge between the chairs that could hold the small houses. I had wanted to make a hard gum paste piece to set under the fondant there for support... But unfortunately, I had to deal with some heat and humidity which was making my gum paste pieces weaker, and this particular one refused to dry in good time. So, running out of time (this was the last day I had to work on the cake before the end of the contest), I just had to go without (I stuck the piece in there anyway, but it... basically did nothing. Hehehe. :-D)
Anyway, I attached the rest of the houses with royal icing, and then noticed that I was REALLY running out of time...
Sooo... I used a mixture of fondant and gum paste, colored light blue, to make the blanket for the top. I rolled this out thinly (but not too thin, because I didn't want it to tear of the peaks of the buildings), let it sit for a few minutes, and then draped it over the top of the cake. Then I used my hands to smooth it down the best I could, making sure the shapes of the buildings could be seen through it.
I used some blue food coloring, after that point, to paint any parts of the white cake underneath blue, and to add some blue shadow under the chairs.
Next, I used a yellow food pen to color windows. This... I wished I hadn't done... it was a little too bright for my taste. I went over it using a paintbrush dipped in clear vanilla to try to mute the color a little, or at least make it look like more of a "Glow" coming out from under the blanket. Unfortunately, that wasn't working out too well, and I was just about out of time...
Soo... I thought I'd see if I could add some color texture to the blue, and ended up using diluted blue color to paint over the outside of the blanket. I mostly decided to do this because I felt that the yellow contrast on the light blue was too much, so I wanted to make the blue a little bit more obvious.
And then... the cake was just about done... Happy. :) So, I (anxious to see how it would look with Lizzy on there), put Lizzy on the board and put the blanket in her hand. Then I snapped some pictures, just because.
My next course of action was to let it dry a little longer, and clear my work surface to take some nicer pictures for the finished photo. But... the heat and humidity got a hold of Lizzy, and her legs gave out. I would have loved to fix her and then take pictures later, but there wasn't time to re-attach the legs and let them dry again... I was out of time (I was doing another project and then going out of town for the rest of the contest duration). So, I have to be content with those few photos that I took on my messy work table. (Sad.) But... oh well. I then cut the cake, had my sister take a picture of me with the piece of cake, and then enjoyed the taste of it (thoroughly) with a cup of tea. :)
This project was a *little* rushed, but all in all, it was a fun and valuable experience! And of course, the cake was delicious. :)
Alright! This could be long, but here goes nothing!
I have been wanting to enter the Threadcakes contest for a couple of years now, but only this year have I taken the time to actually do it. I think I'd always lost the nerve to do it before because... well... all of the other entries are always so amazing! And knowing my skills are limited with making cakes, I was nervous to even attempt it. But, entering the contest this time around, I thought it would be an experience worth having. And it certainly was that!
Start to finish, this is how this cake came to be...
I started by choosing a design. I wanted to choose something that I thought I could make into a cake, but nothing that I felt I couldn't do well. I chose "The Perfect Chair Fort" (one of my favorite Threadless designs) because I felt that it was challenging enough to make me try some new things, but also realistic enough that I felt I could actually have a chance at making it recognizable for what it was supposed to be. :-P So... Then I started sketching out the way it was going to look, just to give myself an actual-size template to go on when I was making everything.
I started by making the girl (I'll call her Lizzy), the teddy bear, and a few little pieces that would sit under the "Blanket" and give the shape of the houses. I worked on all of the buildings over the course of a few days, just because I didn't really have too much time to put into it every day. Making Lizzy was a new experience, since I had never done any modeling before particularly. I also didn't have any modeling paste, and wanting to make her stand up... so, I ended up using gum paste (thinking that it should dry nicely for me). Then I made the chairs. I let these pieces dry for a few days.
Once the chairs were dry, I used diluted brown and copper food colorings to paint the chairs and make them look like wood. Once these were dry (I let them dry overnight, I think), I used royal icing to glue the chair pieces together. I let that dry overnight again, and the following day I painted over the white royal icing with brown to make them look a little neater.
Then I baked the cake; I used a nice yellow cake recipe that I have, and I baked it in a, 11"x15" cake pan. One the cake was cool, I leveled the top and cut it into three pieces (for the three cake layers). I used the cake scraps to make a cake paste mixture of crumbled up cake and buttercream.
I make cakes pretty often, so I had some white chocolate buttercream in my fridge. I used this to fill the layers and make the cake paste. Once that was done, I refrigerated the cake for a bit, then took it out to build up the shape of the top of the cake with the cake paste (I used the picture of the T-shirt design as a template to figure out where to make it taller and where not to-- so that all of my little building shapes would sit at the right heights and in the right places). Then, back into the fridge it went until the cake was nice and cold.
In the meantime (and I know I should have been on this way ahead of time, but alas... I was not), I used a foam cake dummy as the cake board. I used some blue colored fondant to cover it, and then navy blue ribbon to wrap around the sides. Then I set this aside till I was ready to use it.
When the cake was cold enough (so that the cake paste on the top was firm), I crumb-coated the outside and set the cake on a small rectangle board. Then I covered the cake with white fondant, set it onto the cake board in its proper place, and started attaching the buildings with royal icing. I also set up the chairs, and then used a piece of fondant to make a bridge between the chairs that could hold the small houses. I had wanted to make a hard gum paste piece to set under the fondant there for support... But unfortunately, I had to deal with some heat and humidity which was making my gum paste pieces weaker, and this particular one refused to dry in good time. So, running out of time (this was the last day I had to work on the cake before the end of the contest), I just had to go without (I stuck the piece in there anyway, but it... basically did nothing. Hehehe. :-D)
Anyway, I attached the rest of the houses with royal icing, and then noticed that I was REALLY running out of time...
Sooo... I used a mixture of fondant and gum paste, colored light blue, to make the blanket for the top. I rolled this out thinly (but not too thin, because I didn't want it to tear of the peaks of the buildings), let it sit for a few minutes, and then draped it over the top of the cake. Then I used my hands to smooth it down the best I could, making sure the shapes of the buildings could be seen through it.
I used some blue food coloring, after that point, to paint any parts of the white cake underneath blue, and to add some blue shadow under the chairs.
Next, I used a yellow food pen to color windows. This... I wished I hadn't done... it was a little too bright for my taste. I went over it using a paintbrush dipped in clear vanilla to try to mute the color a little, or at least make it look like more of a "Glow" coming out from under the blanket. Unfortunately, that wasn't working out too well, and I was just about out of time...
Soo... I thought I'd see if I could add some color texture to the blue, and ended up using diluted blue color to paint over the outside of the blanket. I mostly decided to do this because I felt that the yellow contrast on the light blue was too much, so I wanted to make the blue a little bit more obvious.
And then... the cake was just about done... Happy. :) So, I (anxious to see how it would look with Lizzy on there), put Lizzy on the board and put the blanket in her hand. Then I snapped some pictures, just because.
My next course of action was to let it dry a little longer, and clear my work surface to take some nicer pictures for the finished photo. But... the heat and humidity got a hold of Lizzy, and her legs gave out. I would have loved to fix her and then take pictures later, but there wasn't time to re-attach the legs and let them dry again... I was out of time (I was doing another project and then going out of town for the rest of the contest duration). So, I have to be content with those few photos that I took on my messy work table. (Sad.) But... oh well. I then cut the cake, had my sister take a picture of me with the piece of cake, and then enjoyed the taste of it (thoroughly) with a cup of tea. :)
This project was a *little* rushed, but all in all, it was a fun and valuable experience! And of course, the cake was delicious. :)
Baker’s site: www.silverspooncakes.com