3D
Happily Ever After
by Christy Rogowski @christy633 · submitted Aug 13, 2011 · 2011 contest
1 / 47
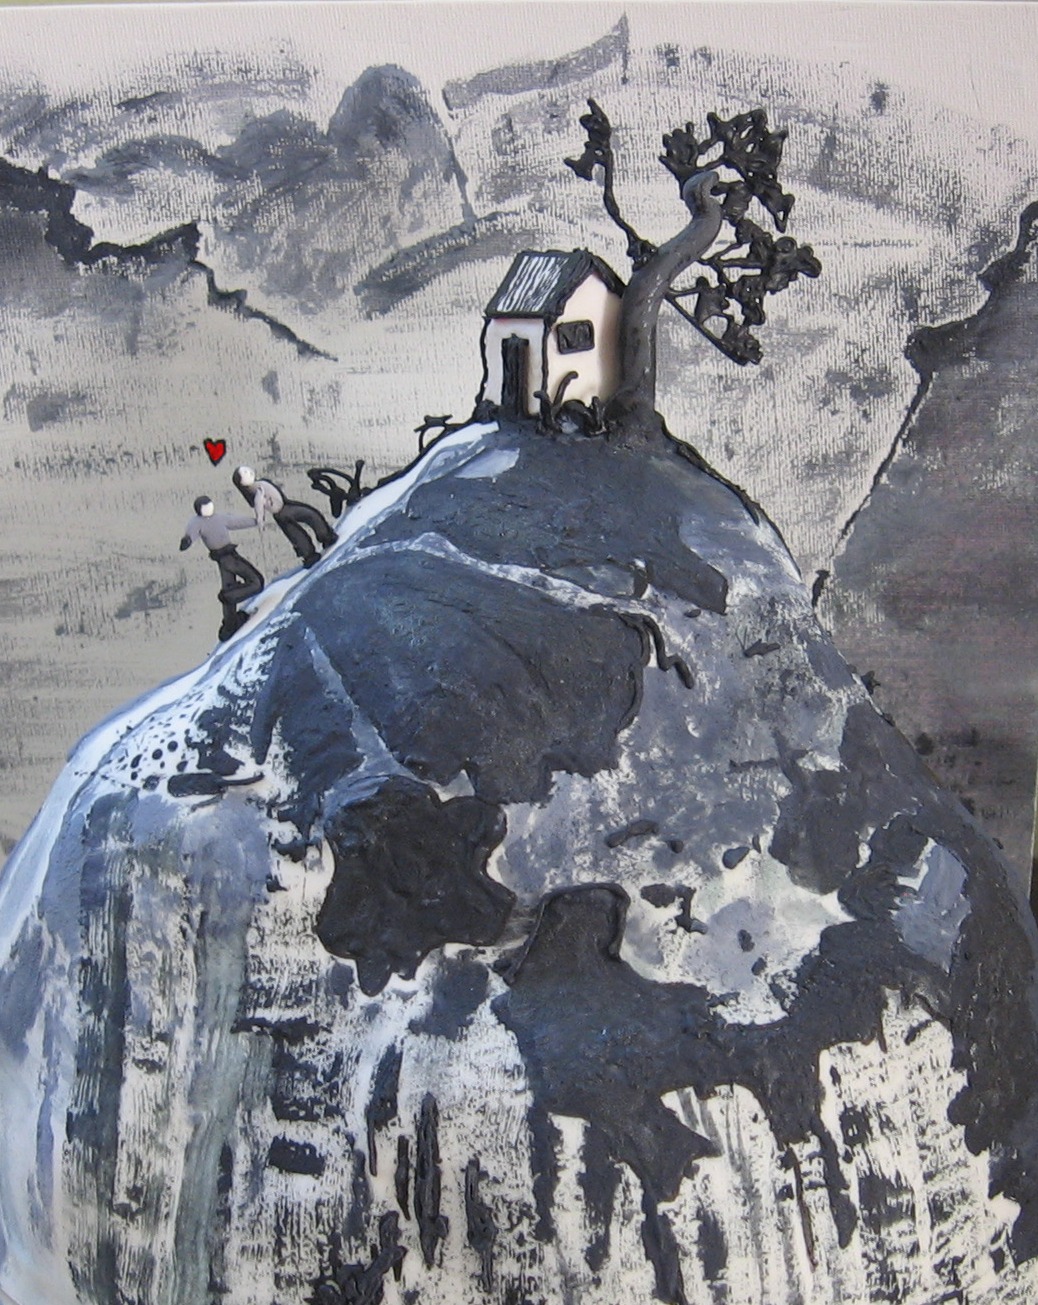
Description
First things first - the design. I went through the long page of designs many times trying to figure out which one would be the best to do in cake form. In the end, I decided to just pick the one that I loved and worry about the cake part later! I love "Happily Ever After". It's very romantic and all my friends know that I love the romance movies :)
Day 1: Cake time! I baked 2-8" rounds and 2-6" rounds of banana chocolate chip cake. I also happened to be baking some vanilla, chocolate and red velvet cupcakes for another occasion, so I held on to a few of those to make "cake mush" - cake & icing for sculpting the mountain. Of course, the standard vanilla buttercream and also some chocolate buttercream for the filling.
Day 2: I stacked the cakes on top of each other with one cupcake on top. I used the "cake mush" to sculpt around the layers. Covered the mountain in vanilla buttercream, followed by a layer of marshmallow fondant. Voila - mountain!
Day 3: This was a challenging day. I carved a bit of red velvet cake for the house. It is good feng shui to have a red door to your house, so I figured it would be best to have a red velvet cake house :) That was covered in fondant, gumpaste roof/shingles using black edible marker and windows and door. I made the base of the tree from gumpaste. I also made the two people from gumpaste - these were the most challenging as they were so little!
Day 4: I had a bare mountain looking at me and I didn't know where to start. I made some royal icing in gray and black and still had a hard time deciding where to paint first, so I switched gears to the background! I knew I needed the background to complete the cake so I bought a canvas at dollarama. The background is painted on with royal icing. Now I've never loved painting, but painting with icing is much, much better. I started in on the mountain after that - the mountain took me two days to paint. Painting black on white fondant makes me nervous!
Day 5: Continued painting the mountain with the royal icing. Some of it is piped on as well using an icing bag and tip #1. For the tree leaves, I piped royal icing onto parchment and when dry, attached it to the tree with royal icing as the glue.
Last day!: The mountain was touched up and the pieces added on! I definitely need one of those things that the chefs have on Food Network challenge - just the air that makes their chocolate dry fast? I need that! I held the tree in place for what seemed like an eternity - I knew if it fell off, I would have to make those leaves all over...
That was it! Thanks to Jay for putting up with me for another contest year :) And they all lived "Happily Ever After"....and ate cake!